Volumes provide a way to allocate storage available in a storage pool and share it over the network.
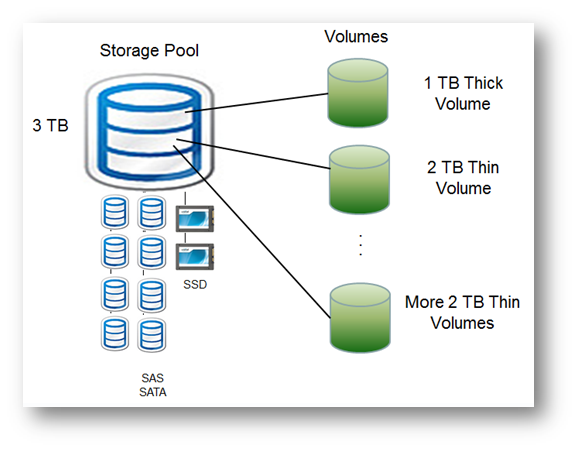
In the above example, the Storage Pool with 3 TB of disk space is allocated from several SAS, SATA and/or SSD devices. There are 3 volumes and like VMDK, a volume can be either thick-provisioned or thin-provisioned. The thick-provisioned volumes cause storage space to be reserved from the storage pool, reducing the amount of storage available for use by other volumes. The thiin-provisioned volumes consume actual storage pool space when the data is written to the volume.
So, there is a thick-provisioned volume which reserves 1 TB of the available 3 TB storage pool and there are also 2 thin provisioned volumes up to 2 TB of thin-provisioned storage space available to each of them.
Note: As each thin-provisioned volume grows with actual data written to the volume, the available storage pool space for all thin-provisioned volumes shrinks to the remaining unused storage pool space.
Creating a volume is very easy. Simply follow the steps given below.
1. Log on to SoftNAS StorageCenter.
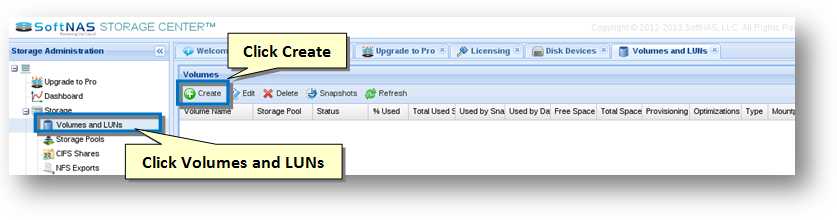
2. In the Left Navigation Pane, select the Volumes and LUNs option under the Settings section.
The Volumes and LUNs panel will be displayed.
3. To create a new volume, click the Create button.
The Create Volume dialog will be displayed.
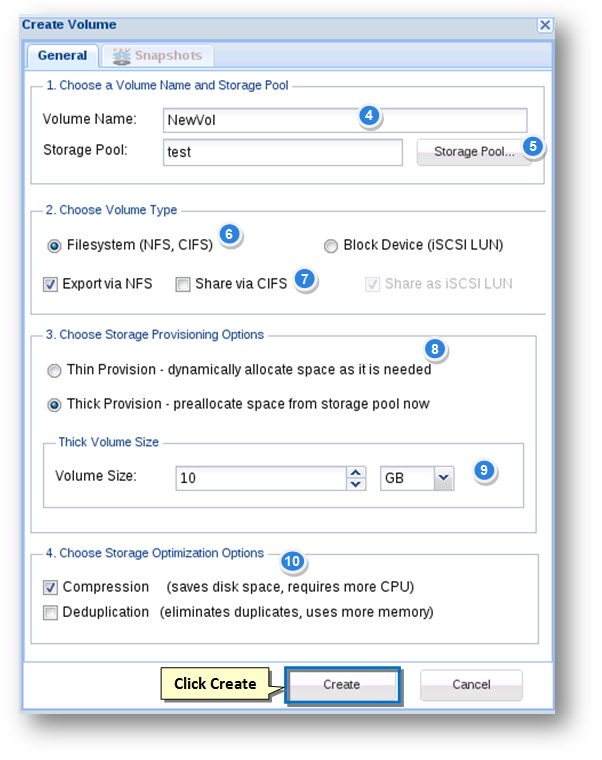
One-click Sharing
4. SoftNAS supports "one-click sharing" during Volume creation. Choose the appropriate sharing option checkboxes to Export to NFS and/or Share via CIFS, as appropriate.
Verify the type of one-click sharing selected. The available options are Export via NFS and Share via CIFS for File System volume type and Share as iSCSI LUN for Block Device volume type.
5. Enter the name of the volume in the Volume Name text entry box.
6. To select the storage pool where the storage space for the volume has to be reserved, click the Storage Pool button.
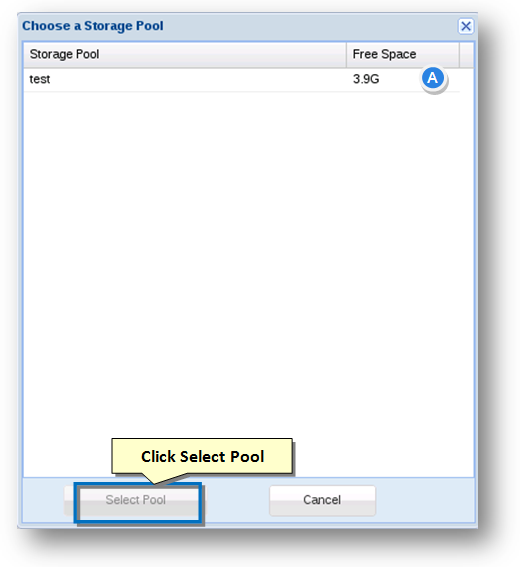
The Choose a Storage Pool dialog will be displayed.
A. Select the required storage pool from the list of available storage pools.
B. Click the Select Pool button.
Back in the Create Volume dialog, the name of the selected storage pool will be displayed in the Storage Pool field.
7. Select the type of the volume from the Volume Type section. The available volume types are File System (NFS, CIFS) and Block Device (iSCSI LUN).
Note: If you want to share the volume via iSCSI, then choose Block Device instead of accepting the default File System volume type.
8. Select the type of the storage provisioning option. The available options include Thin Provision - Dynamically allocate space as it is needed and Thick Provision - Preallocate space from storage pool now.
9. If you select the type of the storage provisioning option as Thick Provision in the previous step, then specify the size of the volume in the Volume Size field and select the size unit.
10. Select the required option for storage optimization in the Storage Optimization Options section. The available options are Compression and Deduplication. The Compression type saves disk space, but requires more of CPU space. The Deduplication type eliminates duplicates, but consumes more memory space.
11. Optionally, you can click the Snapshots tab to configure the same.
Note : Snapshots are enabled on a standard schedule by default whenever a new volume is created.
12. Click the Create button at the end.
The new volume is created and it shared on the network.