Create & Configure a Virtual Machine in Azure
Add the SoftNAS Cloud® VM from within the Microsoft Azure Management Portal, and associate it to a virtual network.
Create the SoftNAS Cloud® VM
-
From the
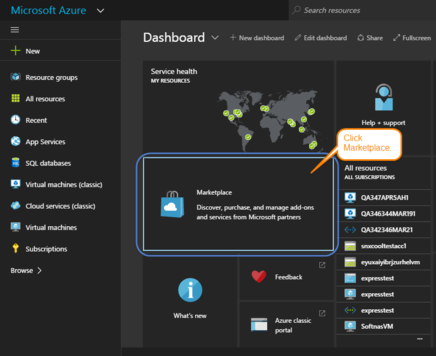
Azure Management Portal, click on
Marketplace.

-
Click Virtual machines. The Virtual machines dialog is displayed.
-
The next step is to
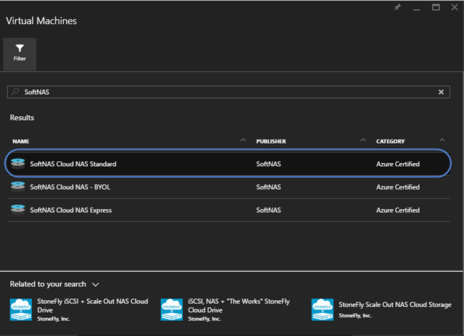
Choose an Image. Search for
SoftNAS in the provided field. Choose the available
SoftNAS Cloud® release version that best fits the deployment scenario and IT budget.

-
Choose the available
SoftNAS Cloud® release version that best fits the deployment scenario and IT budget.

-
Ensure the Resource Manager deployment model is selected, as it is required in order to provide for SoftNAS' advanced features, such as high availability. Click
Create.
Note: As of version 3.4.8 SoftNAS does not support launching SoftNAS Cloud VMs on the classic portal. The Azure Resource Manager (ARM) is the only supported platform.
Configuring VM Name/User Name and Authentication
Here the appropriate VM Name, user name, password, or public SSH key will be set. The user name must be set as 'softnas' or you will be unable to log into your instance. Other users can be created after initial login. If security is a top concern, SSH should be used later to access the SoftNAS Cloud® instance with a Linux login to set the password for User Name softnas. Additional users can be created within the SoftNAS UI after initial configuration.
To make the required settings, configure the network settings as described in the table below.
|
Parameter
|
Description
|
|
Host Name
|
Provide a unique name for the Host.
|
|
User Name
|
Set to softnas. The User Name of softnas is required to login to the virtual machine.
Note: As best practice for security, the password for the softnas account should not be set through the Azure interface. SSH will be used to access the SoftNAS Cloud® VM as a Linux login. The password will be created then.
|
|
Password
|
You can set the Authentication type to Password, and provide a simpler password for your initial SoftNAS login, but this is not as secure a method.
|
|
SSH
|
Paste in the public key for an SHH key pair. For example, use ssh-keygen on Linux or OS X, or Putty on Windows. For more information, see section Generating SSH Keys. |
Setting Size
Microsoft Azure includes a variety of pricing tiers designed to group compute resources together in bundles. SoftNAS Cloud® provides recommendations of 3 commonly used Sizes for best possible product experience. Other Sizes may be used based on user preference. Note that the A0 Size can be used as a perpetually free offering with production limitations.
1. Click on Size. The Size screen is displayed.
Note: Ephemeral storage offered on Azure is for caching purposes only, NOT for storage. When planning your deployment, do not consider ephemeral storage as part of your storage requirement calculations. Ephemeral storage is used to improve read and write-cache performance for your instance. Ephemeral storage is listed as Local SSD in a given VM Size.
2. Use one of the suggested Size, or browse other pricing tiers to meet budgetary and data needs. Click Select when your selection is made.
Optional Features (Settings)
You can now apply optional settings, including Disk Type, Storage Account, Network, and more. Here you can associate the SoftNAS Cloud® VM to an existing virtual network or create a new virtual network specifically for the SoftNAS Cloud® VM.
-
From the
Create VM Blade, click on
Settings.
-
Under
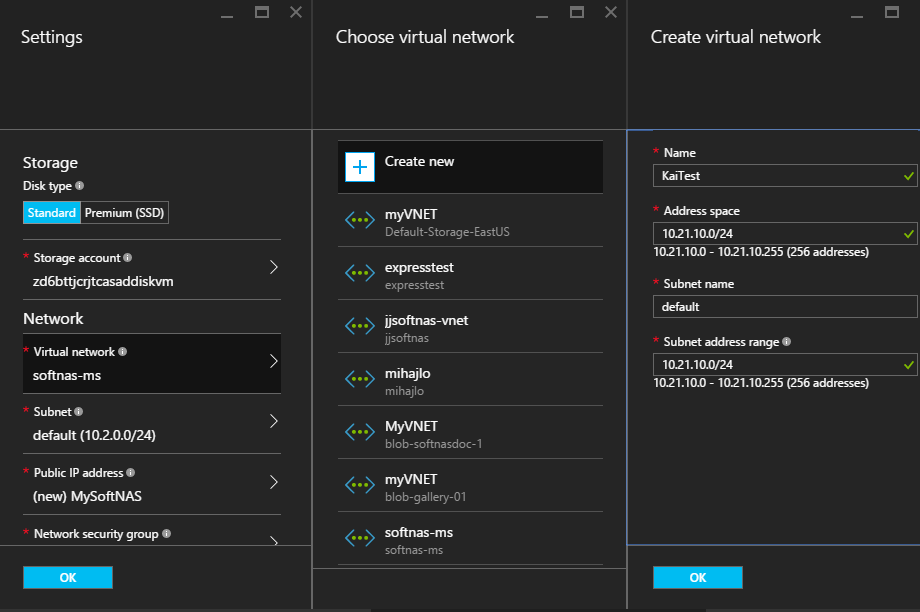
Settings, click on
Virtual Network. The network settings are displayed.

-
Associate the
SoftNAS Cloud® VM to an existing virtual network, or create a new virtual network.
Note: If creating a new network, simply provide a name for the virtual network. It is feasible to use the default CIDR block and to use the default Microsoft Azure DNS server.
In addition to naming your Virtual Network and assigning a CIDR block, you can also apply a subnet, a public IP Address, a security group, etc. The menus are very similar in layout, and highly intuitive to use. Configure your instance as required, using Azure Help Menu if you have any problems or questions.
Purchase
After performing optional configuration, validate and purchase the VM.
1. Click OK to accept any settings changes, and click OK again to validate the settings in Summary.
2. On the next screen, review the purchase details and then click Purchase.
A new SoftNAS Cloud® instance will launch into Microsoft Azure.