The Firewall in SoftNAS helps to control the incoming and outgoing network traffic in VPN.
Typically, storage servers are deployed within an internal, secure network (often on their own VLAN on a protected network segment, perhaps even with dedicated switches). While SoftNAS can be deployed in this, or any other appropriate configuration, it's most common that some other firewall(s) protect the perimeter of the enterprise (from the Internet) and the data center (from the intranet). Use appropriate judgment as to whether or not to employ the Linux firewall, in addition to other security measures in the environment.
If enabling the firewall, be sure to open up the appropriate set of ports for SSH, HTTP. HTTPS, NFS/bind, iSCSI, CIFS, etc.

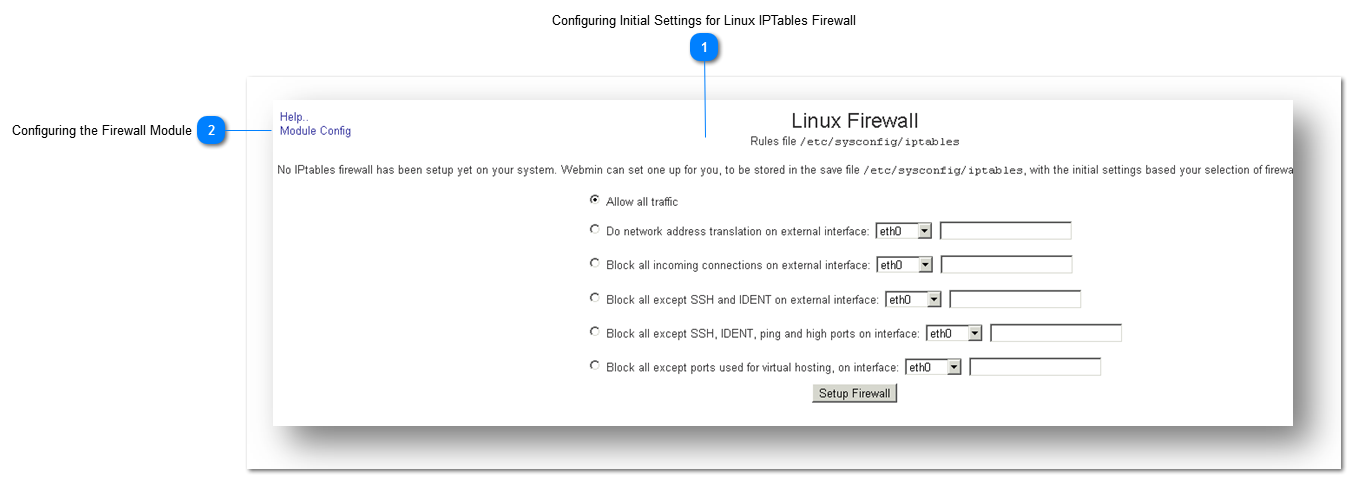
 Configuring Initial Settings for Linux IPTables FirewallSet the Webmin to setup IPtables to be stored as file. First, provide the initial settings.
1. Navigate to Settings > Firewall.
The Linux Firewall page will be displayed.
2. Select any of the required options for firewall setting. The available options include
-
-
Do network address translation on external interface -
Block all incoming connections on external interface -
Block all except SSH and IDENT on external interface -
Block all except SSH, IDENT, ping and high ports on interface -
Block all except ports used for virtual hosting, on interface
3. Click the Setup Firewall button.
The Linux Firewall Rules page for Iptables will be displayed based on the initial settings.
4. Select what IPtable should be showing from the drop down list. The available options include Packet Filtering (Filter), Packet Alteration (Mangle) and Network Address Translation (NAT).
5. Specify the default action to the incoming packets (INPUT) - Only applies to packets addressed to this host from the drop down list. The available options are Accept, Drop, Userspace and Exit Chain.
6. Specify the default action to the forwarded packets (FORWARD) - Only applies to packets passed through this host. The available options are Accept, Drop, Userspace and Exit Chain.
7. Specify the default action to the outgoing packets (OUTPUT) - Only applies to packets originated by this host. There are no rules defined for this chain. The available options are Accept, Drop, Userspace and Exit Chain.
8. Click the Apply Configuration button to make the changes made to the firewall configuration active. Any firewall rules currently in effect will be flushed and replaced.
|
|
 Configuring the Firewall Module
1. On the Firewall page, click the Module Config button.
The Configuration for Linux Firewall module will be displayed.
2. Specify whether to display condition in rules list or not in the field by choosing either Yes or No option.
3. Specify whether to display comment in rules list or not in the field by choosing either Yes or No option.
4. Specify the mode of storing the comments in the field by selecting the appropriate option.
5. Specify when the cluster servers must be updated in the field by choosing the appropriate option.
6. Specify the command to run before changing rules in the field by choosing the option as None or entering comment in the text box. .
8. Specify the command to run after changing rules by choosing the option as None or entering comment in the text box.
9. Specify the command to run before applying configuration by choosing the option as None or entering comment in the text box.
10. Specify the command to run after applying configuration by choosing the option as None or entering comment in the text box.
11. Specify whether the IPtables save file to edit must use operating system or webmin default in the field.
12. Specifiy whether firewall rules can be directly edited instead of save file by choosing Yes or No option.
13. Click the Save button.
The changes made to the firewall configuration module will be updated.
|
|