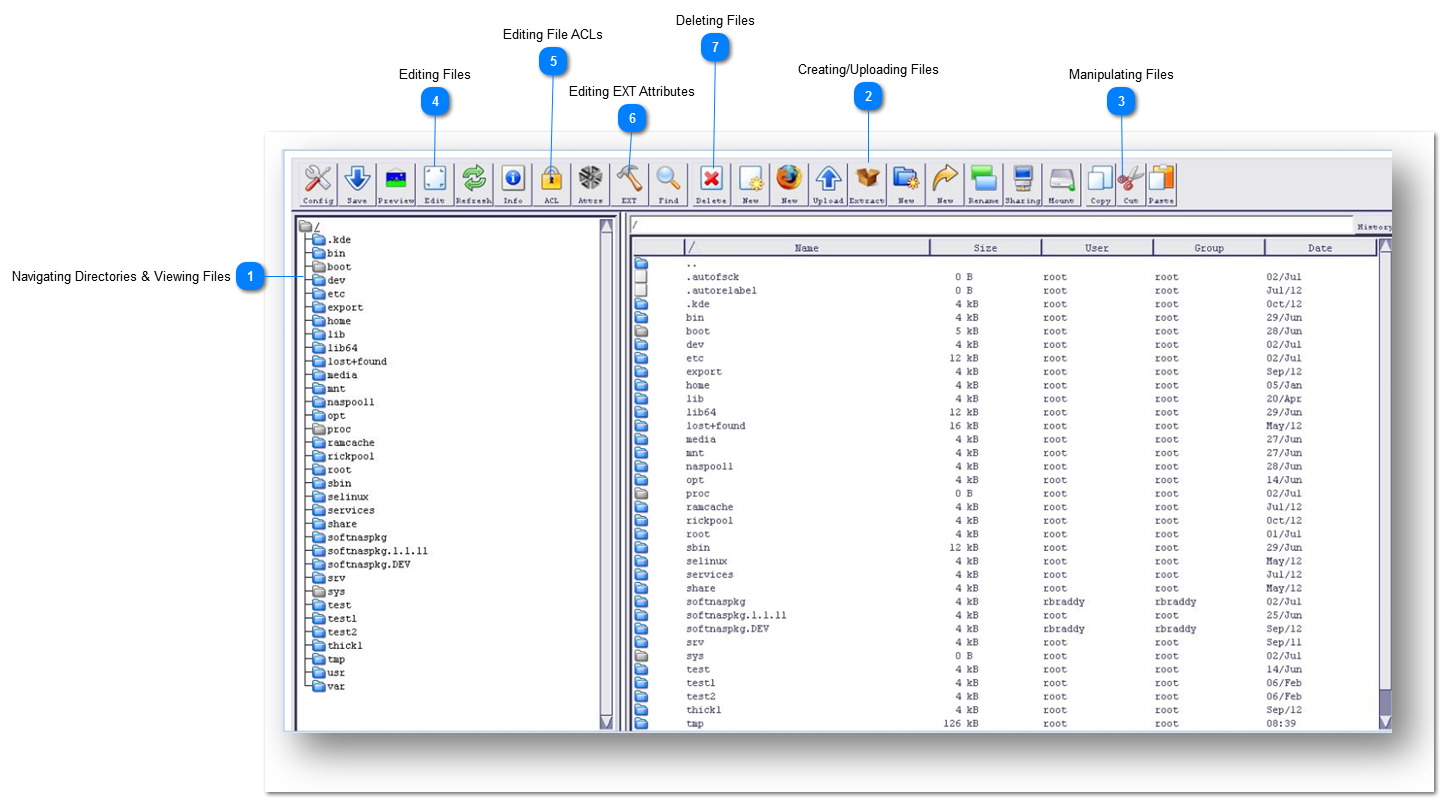
The File System browser is a Java-based applet providing the ability to view and manage the filesystem.
Note: You must have Java installed on the machine where your browser is running for the file system browser to operate.

 Navigating Directories & Viewing Files
When you first load the file manager, the right-hand pane will display the contents of the root directory on your system. To enter another directory, just double-click on it in the list. To go back up a directory, double-click the .. link at the top the current directory’s listing. You can also view the contents of a directory by clicking on it in the tree in the left-hand pane. Double-clicking will open the directory in the tree, causing any subdirectories under it to appear. Double-clicking again will close it. Whenever you enter a directory using the right-hand pane, it will be opened in the tree on the left as well. Similarly, when the .. link is double clicked to go back to the parent, the old directory will be closed in the tree.
The contents of any file on your system can be displayed by double-clicking on it in the right-hand pane. A separate browser window will be opened and the contents of the file will be displayed by your browser. Any file type that the browser supports, therefore, can be viewed using the file manager.
|
|
 Creating/Uploading Files
The File Manager module offers two methods for creating new files—you can either create a text file from scratch, or upload data from the host on which your web browser is running. To create a new empty text file, click on the New document button on the toolbar to the right of the Delete button. This will bring up a window in which you can enter the full path to the file and its contents. When you are done editing, click the Save button at the bottom of the file creation window.
To upload a file from the PC on which your browser is running, click the Upload button on the toolbar. This will open a small browser window with two fields. The File to upload field is for selecting a file on your PC, while the Upload to directory field is for entering the directory to which the file will be uploaded. When both fields have been filled in, click the Upload button to have the file sent to your Webmin server. Once the upload is complete, the directory list will be updated to show the new file.
|
|
 Manipulating Files
The File Manager module allows you to rename, move, and copy files in the just the same way that any other file manager would. To select the file that you want to manipulate, just click on it in the right-hand pane. To select multiple files, hold down the control key while clicking, or hold down the shift key to select an entire range.
To move files to a different directory, select one or more and click the Cut button on the toolbar.
Then navigate to the destination and click the Paste button. If a file with the same name already exists, Webmin will prompt you to rename the pasted file to avoid the clash. If you choose not to rename, the file in the destination directory with the same name will be overwritten.
To copy files, select them in the right-hand pane and click the Copy button. Then go to the directory to which you want them to be copied, and click Paste. As when moving files, you will be prompted to rename any that clash with files that already exist in the destination directory.
Multiple copies of a file can be made by pasting in different directories. To create a copy of a file in the same directory, just select it, click the Copy button and then the Paste button, and enter a new filename..
|
|
 Editing Files
You can edit the file from the File Manager. Each file or directory on a UNIX filesystem is owned by a single user and group and have a set
of permissions that determines who can access it. You can edit that also by clicking the Info button on the toolbar.
Once you have edited the file, click the Save button to retain the changes.
|
|
 Editing File ACLs
By setting up an ACL for a file, you can grant permissions to additional users or groups in addition to the normal owner and group.
Open the file and click the ACL button. The ACL for a directory can include several special default entries that determine the initial ACL of any file created in the directory. Default user, group, and mask entries can be created, and the default user and group can apply to either a specific user or the owner of the file.
|
|
 Editing EXT Attributes
Several UNIX filesystem types support special attributes on files beyond those that can be set with the normal chmod and chown commands. You can change the EXT attributes for files if the files contain those attributes.
Open the file that contains EXT attributes and click the EXT button. You can control and stop access time updates, processes that modify content and prevent file from modification or deletion. You can also make the kernel automatically compress the contents of the file.
|
|
 Deleting Files
You can delete one or more files and directories by selecting them and clicking the Delete button on the toolbar. Before they are actually removed, a confirmation window listing all chosen files will be displayed. When the Delete button in the window is clicked, all chosen files, directories, and their contents will be permanently deleted.
|
|