MTU 9000
To increase throughput and performance, it is recommended to use MTU 9000 instead of the default MTU 1500. In order to use MTU 9000, all network switching and routing elements between the SoftNAS VM and the client device must support MTU 9000.
Note that for MTU 9000 to work properly, it must be configured on all physical switch ports, routers, host servers and virtual switches (and within SoftNAS network interfaces). Be sure to verify your networking paths and hosts end to end if you plan to use MTU 9000 (or it can actually reduce performance and potentially cause packet loss or retries if not configured properly).
EC2 Users - Due to the specific ways in which EC2 physical servers and networking infrastructure are configured, some of the physical hosts support jumbo frames, and others do not. On physical hosts that support jumbo frames, AWS will push the 9001 MTU setting through to the virtual machines on that physical host. On the ones that don't, AWS will not push that 9001 MTU setting. This info is tucked away in AWS docs at http://docs.aws.amazon.com/AWSEC2/latest/UserGuide/instance-types.html: "The maximum transmission unit (MTU) for an instance depends on its instance type. The following instance types provide 9001 MTU (jumbo frames): CC2, C3, CG1, CR1, G2, HS1, HI1, I2, and M3. The other instance types provide 1500 MTU (Ethernet v2 frames)."
For example:
- SoftNAS VM, eth1 <=> vSwitch <=> VM host physical NIC <=> Physical switch ports <=> VM host 2 NIC <=> vSwitch 2 <=> Client VM
For MTU 9000 to work, all virtual and physical switch ports must be configured for MTU 9000, as well as the virtual machine client's (or VMkernels, if client is running on VMDK.
Within SoftNAS, to configure MTU 9000 to be persistent upon reboot, simply follow the steps given below.
1. Log on to SoftNAS StorageCenter.
2. In the Left Navigation Pane, select the Network Settings option under the Settings section.
The Network Settings panel will be displayed. From here, you can configure and manage all network configuration.
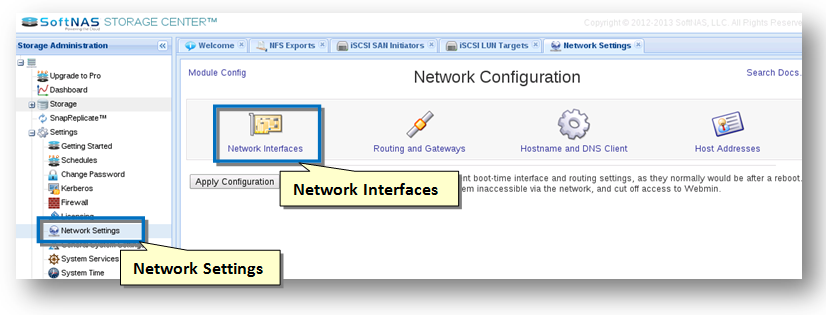
3. Click the Network Interfaces button.
The Network Interfaces section of the panel will be displayed.
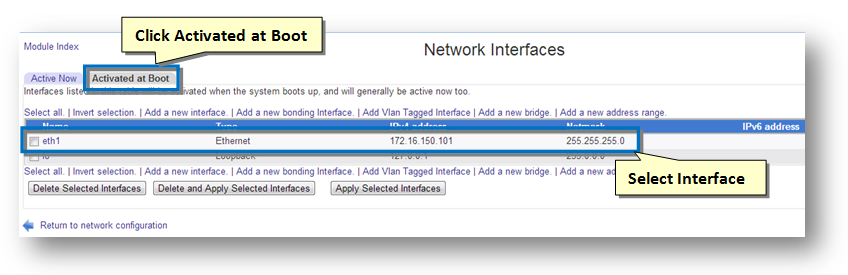
4. Click the Activated at Boot tab.
5. Select the network interface (eth1) in the list of the interfaces.
The Edit Bootup Interface section of the panel will be displayed.
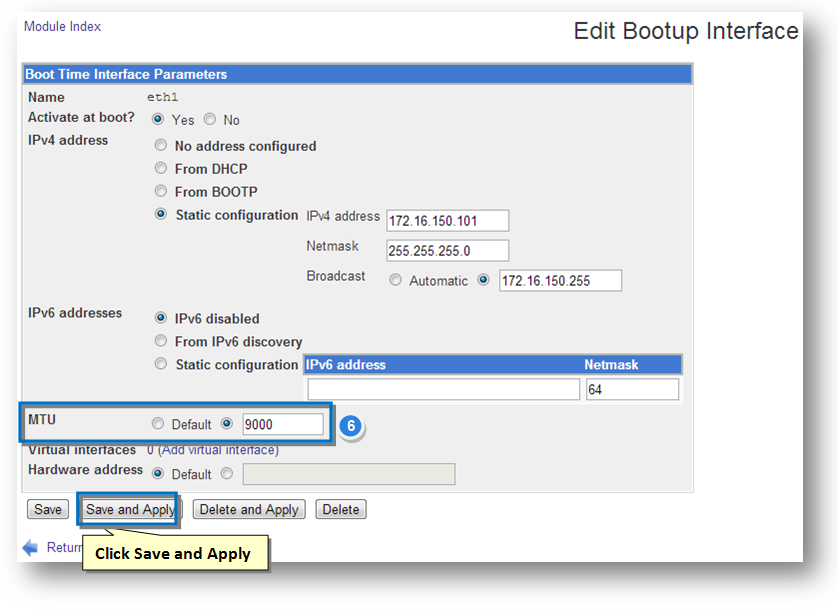
6. In the MTU field, you need to change the value from default to 9000. In order to do so, check the option for the text entry box and enter the value 9000 in the text box.
7. Click the Save and Apply button.
8. Back in the Network Interfaces panel, click the Active Now tab.
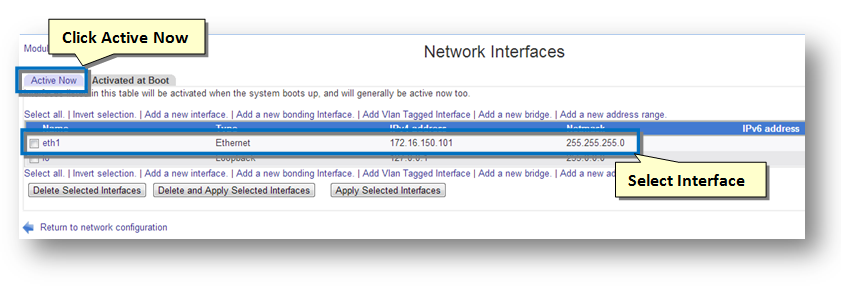
9. Select the interface name (eth1).
The Edit Active Interface section of the panel will be displayed.
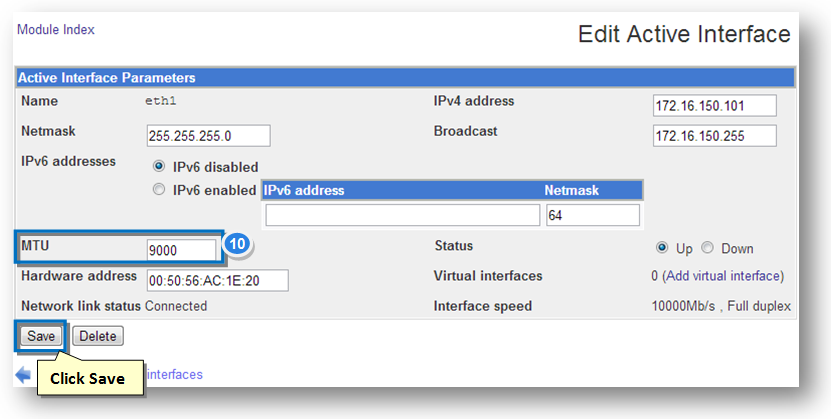
10. In the MTU field, enter the value as 9000 in the text entry box. This will change the current network interface value to MTU 9000. Be sure that all your switching paths are configured to support MTU 9000 before making this change (or you could lose connectivity).
11. Click the Save button.
Configuring VMware for MTU 9000
Before enabling jumbo frames be sure to ensure that your physical server's network interface card can support jumbo frames and your network switch supports jumbo frames (MTU 9000) and the switch ports of all routers and switches between SoftNAS and VMware hosts are properly configured for MTU 9000.
VMWare ESX/ESXi support frames up to 9 Kb (MTU 9000).
In order to use jumbo frames support configuration is required end to end.
These commands are good for ESX/ESXi 5.0 and later:
1. Log into your host with the vSphere client
2. Select the physical host you want to make changes to and click on the
3. Choose the Configuration tab
4. Select the Networking option under Hardware
5. Select properties on the vSwitch you wish to configure
6. When the vSwitch is selected you will see the MTU set under Advanced
7. Set Properties. The default is 1500.
8. Click the Edit button on the bottom while the vSwitch is selected
9. On the General tab there is a box labeled Advanced Properties
10. Change the MTU here from 1500 to 9000 and click OK
Additionally you will need to change the MTU for the VMK (VM kernel).
In the same vSwitch Properties box select your first VMK listed
11. Under NIC Settings you will see the MAC address and MTU.
12. Click Edit for the first VMK
13. On the properties dialogue box that pops up set the MTU in the NIC settings box on the General tab to 9000 and click OK
14. Repeat this for all VMKs under the virtual switch
15. Close the vSwitch properties dialogue and repeat for any remaining vSwitches
Be sure to set the SoftNAS network interface to accept Jumbo Frames / MTU 9000, as described above.