Creating Storage Pools
In case of Amazon EC2, you have added EBS Volumes as data disks to the SoftNAS instance and in case of VMware or Hyper-V, you have added data disks to the SoftNAS VM. Now you can partition the disks and then create storage pools.
The storage pools are used to aggregate disk storage into a large pool of storage that can be conveniently allocated and shared by volumes.
Storage Pools for Amazon EC2-Based SoftNAS Instance
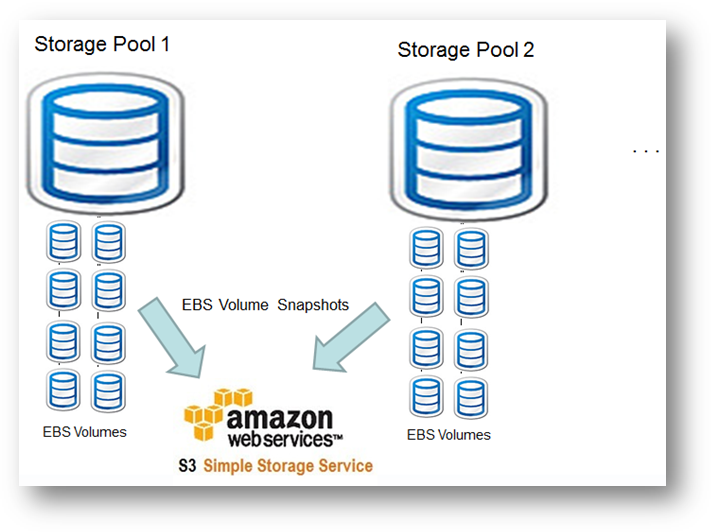
In the following example, there are two storage pools designed for Amazon EC2 based SoftNAS instance. The Storage Pool 1 is a high-performance pool with SAS disks arranged in a RAID configuration. The Storage Pool 2 is a high-capacity pool with SATA disks arranged in a RAID configuration. You can design any kind of storage pool or RAID configuration. But these two are the most recommended type of storage pools.
The EBS volumes can be conveniently backed up to Amazon S3 redundant storage using EBS Volume Snapshot functionality, which is built into Amazon Web Services.
Storage Pools for VMware/Hyper-V Based SoftNAS VM
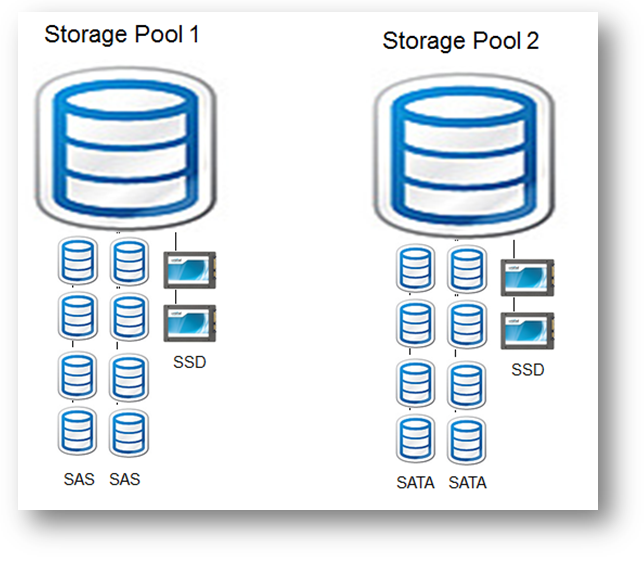
In the following example, there are two storage pools designed for VMware / Hyper-V based SoftNAS VM. The Storage Pool 1 is a high-performance pool with SAS disks arranged in a RAID configuration. It is supplemented with two SSD devices - one for read cache and other for write log SSD. The Storage Pool 2 is a high-capacity pool with SATA disks arranged in a RAID configuration.It is also supplemented with two SSD's. You can design any kind of storage pool or RAID configuration. But these two are the most recommended type of storage pools.
The SSD's are optional, but they provide an enormous boost in read/write performance and have the ability to absorb spikes in I/O (each SSD can handle 20K to 40K IOPS).
Before Creating the Storage Pool
Before creating the Storage Pool, you will need to have created several EBS volumes for Amazon EC2 based SoftNAS instance and several VHDs for VMware/Hyper-V based SoftNAS VM. These EBS volumes or VHDs provide the underlying storage for SoftNAS storage pools. Whenever a volume or VHD is added, it begins as a raw disk which means that the disk has no partitions.
Note: Before you assign disk devices to a storage pool, you must partition the disks.
Partitioning Disk Devices
To partition a disk device
1. Log on to SoftNAS StorageCenter.
2. In the Left Navigation Pane, select the Disk Devices option under the Storage section.
The Disk Devices panel will be displayed.
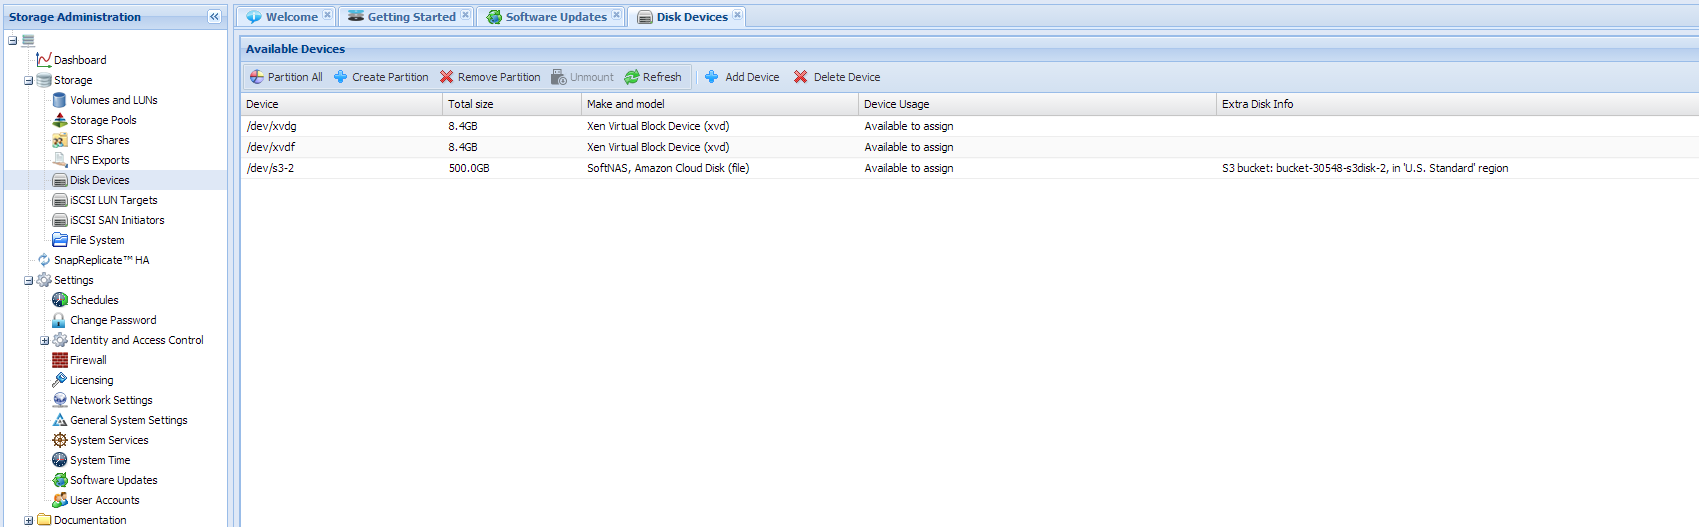
Disk devices must be partitioned prior to use. The available devices are listed in the "Available Devices" grid, as shown above.
Device Usage - indicates the current status of the device, which can be:
-
Device needs partition - the initial state for a new device that has no partition
-
Available to assign - the device is partitioned and ready for use in a storage pool
-
Used in pool <poolname> - the device is in use by the indicated storage pool name
Use the buttons on the toolbar to partition the devices for initial use.
Partition All - Use the Partition All button to partition all disk devices.
You can also select each disk device, then use the "Create Partition" button to partition a device individually.
The "Remote Partition" button can be used to remove an existing partition that is no longer needed.
Creating Storage Pools
Before creating the Storage Pool, you will need to have created several EBS volumes for Amazon EC2 based SoftNAS instance and several VHDs for VMware/Hyper-V based SoftNAS VM.
These EBS volumes or VHDs provide the underlying storage for SoftNAS storage pools. Whenever a volume or VHD is added, it begins as a raw disk which means that the disk has no partitions.
Note: Before you assign disk devices to a storage pool, you must partition the disks.
1. Click the Storage Pools option under the Storage section in the Left Navigation Pane.
The Storage Pools panel will be displayed with the list of all the existing storage pools that are already allocated.
2. To create a new storage pool, click the Create button.
The Create New Storage Pool dialog will be displayed.
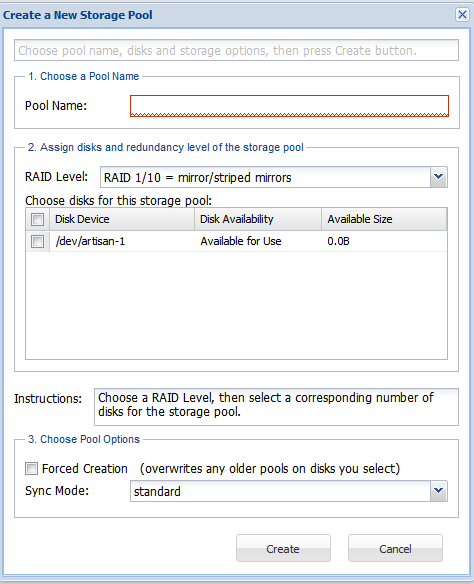
3. Enter the name for the storage pool that you wish to create, in the Pool Name text entry box.
Some example storage pool naming schemes might include:
-
Generic naming: naspool1, naspool2, ...
-
Disk-type naming: SAS1, SAS2, SATA1, SATA2
-
Use-case naming: OS1, OS2, Exchange1, SQLData1, UserData1, Geology, Accounting, IT, R&D, QA, Corp01, etc.
4. Select the redundancy level from the RAID Level drop down list.
Note: If you are using hardware RAID at the disk controller level and have a single data disk presented to SoftNAS for your storage pool, then you may not need software RAID - in sucg case, select No RAID/JBOD, as the RAID is implemented at a lower level and have no need for software RAID.
5. Select the disks for which you wish to allocate to this storage pool.
Note: Each of the devices show the Disk Availability status as Available for Use. This implies that these disks are already partitioned. New disk devices must be partitioned before use.
6. In the Choose Pool Options step, check the box in the Forced Creation field if you wish to overwrite any older pools on the disks that you have selected.
Note: If any of the disk devices you choose have been used as a part of another storage pool in the past (e.g., one that was deleted), you must use the Forced Creation option to overwrite the previous data in order to use the disk in a different pool (a precaution to prevent accidental data loss).
7. Choose the required Sync Mode:
-
standard:
This is the default option. Synchronous file system transactions (fsync, O_DSYNC, O_SYNC, etc) are written out (to the intent log) and then secondly all devices written are flushed to ensure the data is stable (not cached by device controllers).
-
always:
For the ultra-cautious, every file system transaction is written and flushed to stable storage by a system call return. This obviously has a big performance penalty.
-
disabled:
Synchronous requests are disabled. File system transactions only commit to stable storage on the next DMU transaction group commit which can be many seconds. This option gives the highest performance. However, it is very dangerous as ZFS is ignoring the synchronous transaction demands of applications such as databases or NFS. Setting sync=disabled on the currently active root or /var file system may result in out-of-spec behavior, application data loss and increased vulnerability to replay attacks. This option does *NOT* affect ZFS on-disk consistency. Administrators should only use this when these risks are understood.
8. Click the Create button at the end.
The new storage pool is created and is ready for use.