Creating NFS Export
Note: Before you can do NFS Export, you need to create a volume to share. When creating a volume, there is an option to create a default NFS share. Use the functions on this page to add or modify NFS export shares.
1. Log on to SoftNAS StorageCenter.
2. In the Left Navigation Pane, select the NFS Exports option under the Storage section.
The NFS Shares panel will be displayed. From here, you can configure and manage NFS sharing.
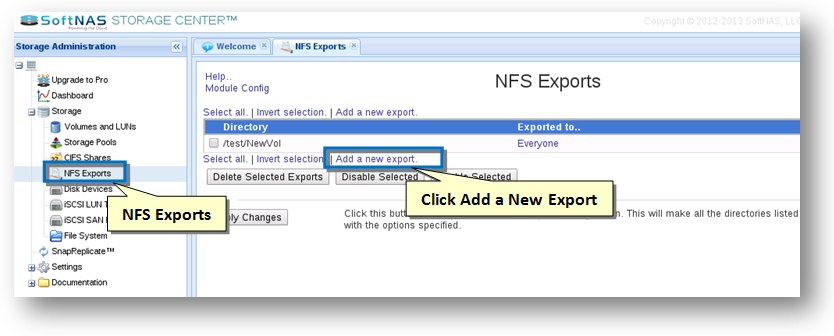
3. Click the Add a New Export link.
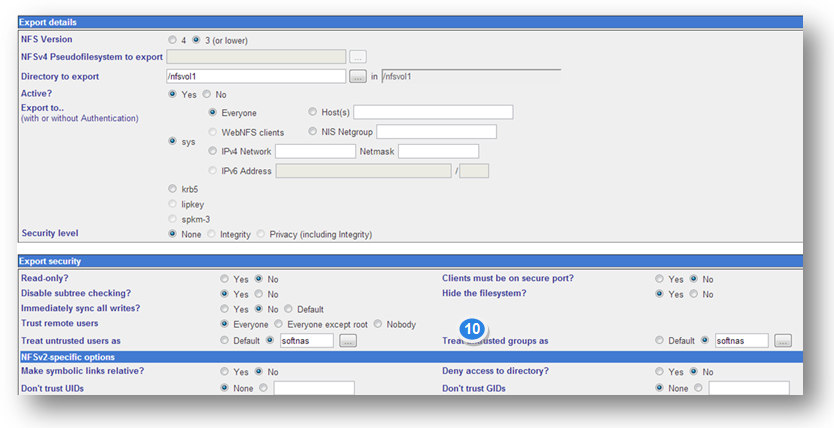
The Create Export section of the panel will be displayed.

4. In the Export Details section, specify the NFS version in the NFS Version field.
Note: The example has NFS version 3, but other settings such as NFS version 4 may also work better in some environments. Choose the most appropriate settings for your particular environment, security and operational needs.
5. In the Directory to Export field, click the  button to select the directory that you wish to export.
6. Set the Active field to Yes.
7. In the Export to field, specify the system IPV4 Network and Netmask addresses in the respective text entry boxes.
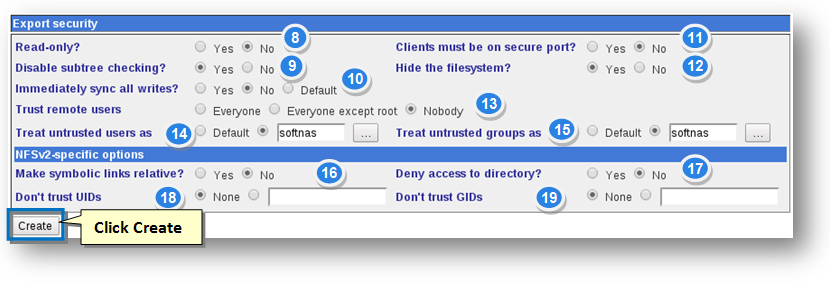
8. In the Export Security section, specify the Read-only field as No.
9. Set the Disable Subtree Checking field to Yes.
10. Set the Immediately Sync All Writes filed to Yes.
Note: For best performance throughput, choose No for Immediately Sync All Writes field. This option allows NFS to cache the write and return to the caller immediately (up to 10 times better throughput has been observed by not immediately sync'ing writes, so No setting makes a big difference in performance sensitive applications). If you choose No for this option, writes will be cached in memory longer (NFS "async" option), which increases the potential for loss of data should there be a loss or power or other unexpected system failure, so take this into consideration, as well as performance. Only consider setting this option to No if you have a proper UPS in place. Note that cached data not yet written to disk could be lost if this option is set to No (which in turns sets NFS export to "async").
11. Set the Clients Must be On Secure Port to No.
12. Set the Hide the Filesystem field to Yes.
13. Set the Trust Remote Users field to Nobody.
Note If you are planning to mount this NFS share from VMware, you must select Nobody as the Trust Remote Users choice. VMware hosts do not authenticate by default, so it's also best to restrict the IP address range appropriately to limit which NFS clients can connect to the NFS export.
14. Specify the untrusted users in the Treat Untrusted Users as softnas.
15. Specify the untrusted groups in the Treat Untrusted Groups as softnas.
16. Set the Make Symbolic Links Relative field to No.
17. Set the Deny Access to Directory field to No.
18. Set the Don't Trust UIDs field to None.
19. Set the Don't Trust GIDs field to None.
20. Click the Create button.
The NFS Exports panel will be displayed.
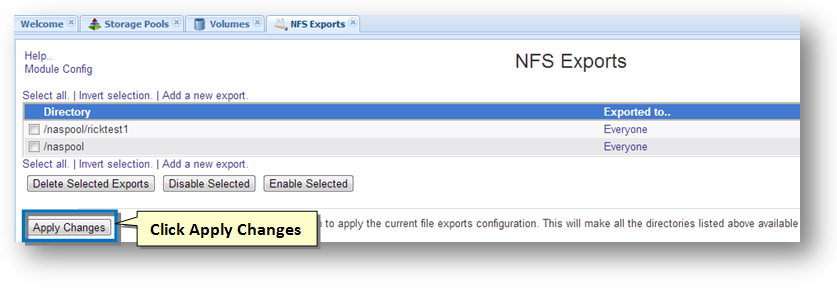
21. Click the Apply Changes button.
The NFS export settings will be activated.
Mounting the NFS Share from VMware
Now that you have an NFS Share available, you can mount and use the NFS-shared volume as a VMware datastore.
To mount NFS as a datastore, simply follow the steps given below.
1. Log into vCenter (or vSphere if managing VM hosts directly)
2. For each VMware host that needs shared access to the NFS-shared datastore, select the Configuration tab in vSphere client.
3. Select the Storage option from left-side menu.
The datastore list will be displayed.
4. Select the Add Storage...option from upper-right menu.
The Add Storage wizard will be displayed.
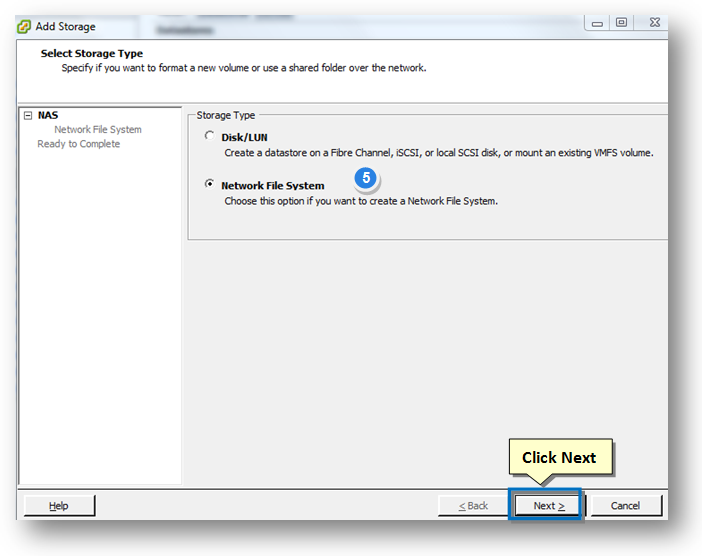
5. Select the Network File System option in the Storage Type section.
6. Click the Next button to continue.
The Locate Network File System section of the wizard will be displayed.
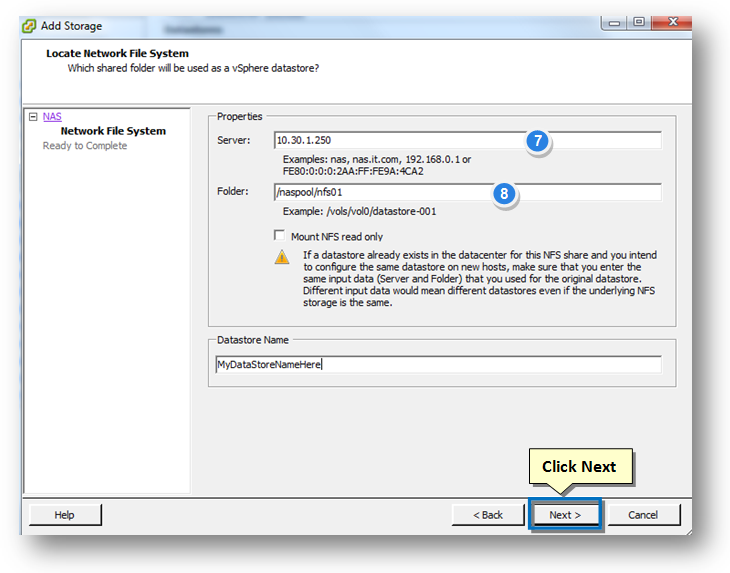
7. In the Properties section, enter the IP address of the SoftNAS in the Server text entry box.
Note: If you hadded the SoftNAS IP to DNS, you can use the SoftNAS DNS name itself.
8. Enter the path of the folder for NFS export in the Folder text entry box.
9. Enter the name of the datastore in the Datastore Name text entry box.
Note: Repeat the above process for each VMware host that needs to access the datastore. In an HA configuration, Make sure that all VMware hosts have this NFS datastore configured.
10. Click the Next button.
Note: The most common issue at this point is an Access Denied error when trying to mount the NFS export. This typically means you did not choose the Nobody option under Trust remove users, or you may have another security configuration setting problem. Go back to the NFS export configuration panel, click on the NFS export and resolve the security issue. The settings shown above are known to work correctly with VMware (there may be other security settings preferred for your own environment.
Mounting from Windows NFS Clients
The following settings work well for Windows-based NFS clients:
Note: Although the above example shows certain settings, such as NFS version 3, other settings such as NFS version 4 may work better in some environments. Choose the most appropriate settings for your particular environment, security and operational needs.
NFS and Firewall Settings
Using NFS may involve opening additional ports in any firewalls that sit between your SoftNAS VM and workload VM's, which will otherwise block traffic (esp. if traversing to an external IP in cloud-based situations).
Here are the ports required for NFS client mounts, according to the settings located in /etc/sysconfig/nfs:
TCP
Port (Service) Source Service
111 x.x.x.x/24 portmapper
2010 x.x.x.x/24 rquotad
2011 x.x.x.x/24 nlockmgr
2013 x.x.x.x/24 mountd
2014 x.x.x.x/24 status
2049 x.x.x.x/24 nfs
UDP
Port (Service) Source Service
111 x.x.x.x/24 portmapper
2010 x.x.x.x/24 rquotad
2012 x.x.x.x/24 nlockmgr
2013 x.x.x.x/24 mountd
2014 x.x.x.x/24 status
2049 x.x.x.x/24 nfs
The above ports were determined by logging into SoftNAS and running an rpcinfo -p command, which displays the ports being used for RPC.
Be sure to should lock the address range down to only the subnet where your allowed EC2 instances reside (or the particular IP range that's appropriate).
NFS Client Mount from Linux
To mount the NFS volume from Linux, Unix or Mac OS, use the mount command as the root user:
# mount -o rsize=32768,wsize=32768,noatime,intr <ip-address>:<export-path> <mnt-point>
where, <ip-address> is the IP address (or DNS name) of the SoftNAS server, <export-path> is the path chosen when exporting the filesystem via NFS and <mnt-point> is the mount point in the local filesystem.
For example:
# mkdir /myvol
# mount 172.16.1.100:/naspool1/myvol01 /myvol
The above command creates a new directory to be used as the mount point, then mounts a storage pool naspool1 with volume myvol01 at export path /naspool1/myvol01 to /myvol, on the SoftNAS server at 172.16.1.100.
For better performance, use this command variation, which sets the read/write size to 32K and disables setting last access time and intr options:
# mount -o rsize=32768,wsize=32768,noatime,intr 172.16.150.100:/export/vol01 /mnt/vol01
To unmount the filesystem, use the umount /poolname/volname command.
NFS v4 and Authentication Considerations
NFS v4 provides for separation of filesystem metadata and file data I/O, improving performance and throughput. It is also possible to configure NFS v4 to operate in conjunction with Kerberos and LDAP for user authentication. Use of an authentication server allows each user who mounts and accesses NFS exports to have their unique user ID (uid) and group ID (gid) maintained on the NFS server. More details on configuring NFS v4 and use of NFS in conjunction with kerberos and LDAP.
Common NFS Issues
The most common issue encountered when mounting and using an NFS volume are Access Denied and read-only types of problems.
Access Denied - This typically happens when you try to mount an NFS export that has been restricted by IP address range, user ID or other permission restrictions. Try opening up the NFS export for access by any IP address and Everyone; i.e., loosen the security up during initial testing, then lock it back down one step at a time.
Read-Only Access - When this happens, you are able to mount the filesystem, but you cannot write to the mounted filesystem. This is a security permissions issue. Try opening up the permissions on the NFS export to Everyone as a starting point, then once you know you have a working NFS mount, you can choose to lock the security down incrementally.