Active Directory Integration
Overview
Integration of SoftNAS into Active Directory enables domain users to more securely share files and data in a corporate environment. Authentication is managed by Active Directory (AD) via Kerberos. Kerberos tickets are issued to users authenticated to AD. When a user accesses a CIFS share managed by SoftNAS, the ticket is then verified with AD to ensure it is authentic and valid before allowing access to the shares. Windows user ID's and groups (e.g., Domain Users) are transparently and dynamically mapped from AD into SoftNAS and Linux, making access seamless for Windows users.
When integrated into a domain environment, SoftNAS becomes another member server of the domain - like any other Windows server joined to the domain.
Authorization and granular access controls are available to manage the level of access available to various users and user groups.
The following sections detail how to configure SoftNAS for integration with Active Directory and how to troubleshoot and resolve common issues that can arise during AD integration.
Installating Necessary Packages
1. Install the necessary packages or perform the Software Updates.
These packages should already be installed if you are running the latest Software Updates.
2. If you need to manually install or update for any reason, use the following commands.
Note: Run as root from command line.
# yum install krb5-workstation
# yum install samba-winbind
Configuring Kerberos to Connect to Active Directory
1. Log on to SoftNAS StorageCenter.
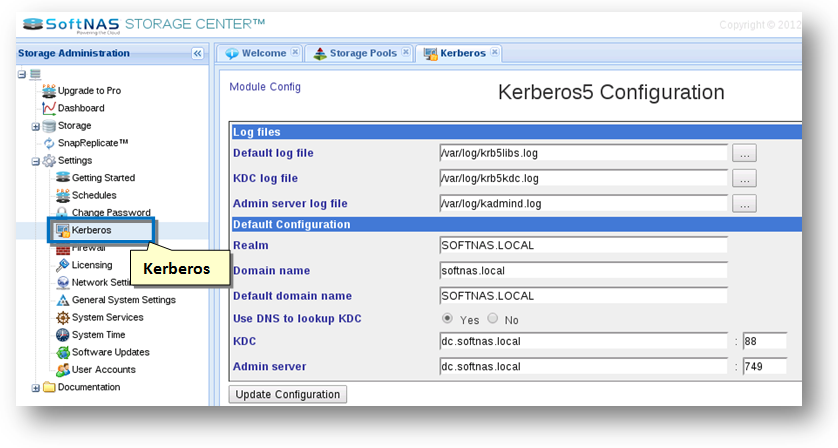
2. In the Left Navigation Pane, select the Kerberos option under the Settings section.
OR
In the Left Navigation Pane, select the General System Settings option under the Settings section. Then select the Kereros5 in the Networking section.
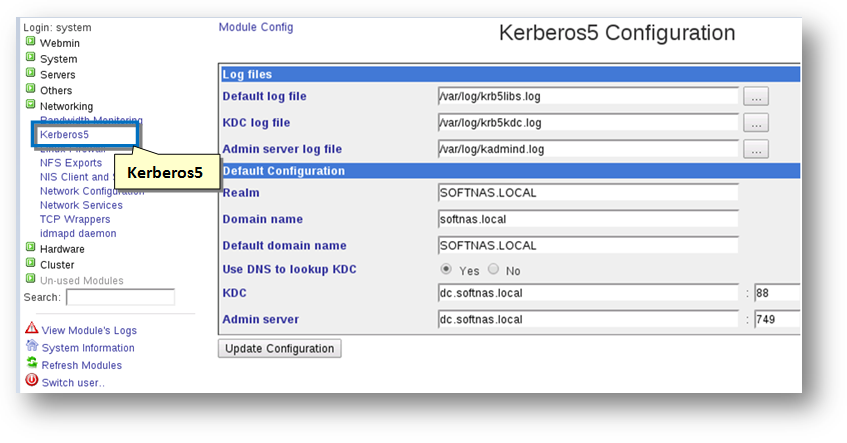
The Kerberos Configuration panel will be displayed.
3. Enter the server name in upper case in the Realm text entry box.
4. Click the Update Configuration button.
Verifying the Working of Kerberos
In the above example, SOFTNAS.LOCAL is the full domain name.
[root@softnas]# kinit -p administrator
[root@softnas]# klist
You should see something like:
Ticket cache: FILE:/tmp/krb5cc_0
Default principal: administrator@SOFTNAS.LOCAL
Valid starting Expires Service principal
01/21/13 17:26:12 01/22/13 03:26:20 krbtgt/SOFTNAS.LOCAL@SOFTNAS.LOCAL
renew until 01/22/13 17:26:12
Adding Domain Controllers as DNS Server for SoftNAS
You need to verify that your hostname and DNS are set up correctly:
1. To do so, in the Left Navigation Pane, navigate to General System Settings -> Networking > Network Configuration > Hostname and DNS client and Host Addresses.
2. The DNS for SoftNAS, when integrated within an Active Directory environment, should be the domain controllers (like any other member server in the domain).
You should see the following at the top of /etc/resolv.conf (xxx.xxx.xxx.xxx is the IP address of Domain Controller)
nameserver xxx.xxx.xxx.xxx
As a reminder, anytime you change the DNS or network settings, be sure to either issue a service network restart command as root user or reboot SoftNAS with a sync; sync; reboot sequence to restart the network subsystem so the new settings will take effect.
Editing Samba Windows Networking Options settings with SoftNAS GUI
1. Log on to SoftNAS StorageCenter.
2. In the Left Navigation Pane, select the CIFS option under the Storage section.
The CIFS Shares panel will be displayed. From here, you can configure and manage CIFS sharing.
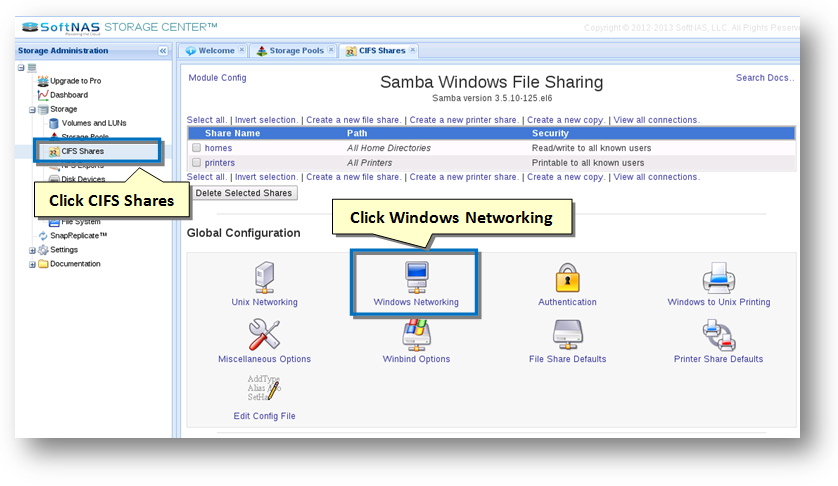
3. Click the Windows Networking icon in the Global Configuration section.
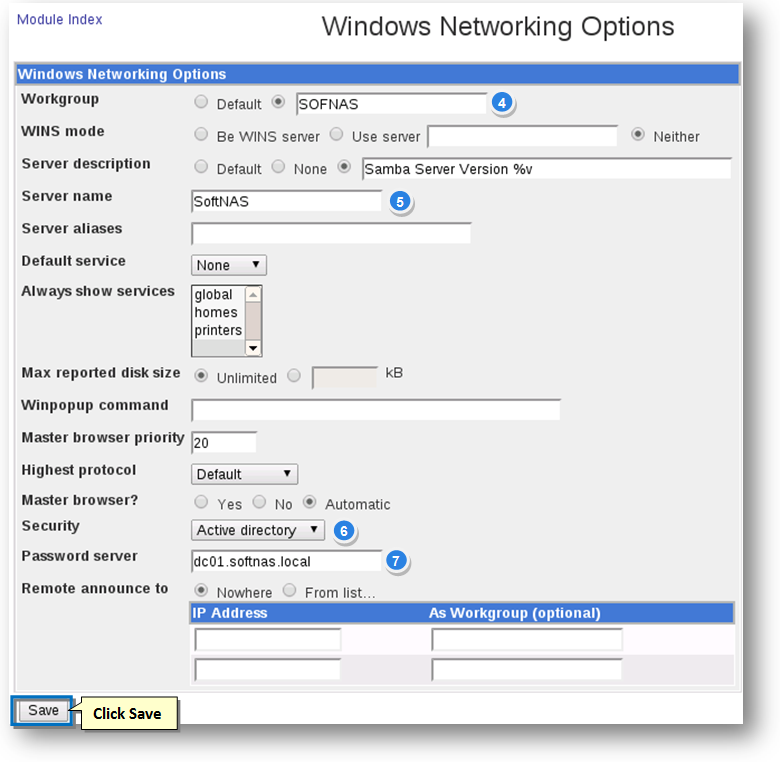
4. Enter your short domain name (e.g., SOFTNAS) in the Workgroup field.
5. Enter the NetBIOS name of your SoftNAS Server (how it will show up under Windows Networking) in the Server Name text entry box.
6. Select the Active Directory option from the Security drop down list.
7. Enter the FQDN of your domain controller; e.g., dc01.softnas.local in the Password Server text entry box.
8. Click the Save button.
Configuring Winbind with SoftNAS GUI
1. Log on to SoftNAS StorageCenter.
2. In the Left Navigation Pane, select the CIFS option under the Storage section.
The CIFS Shares panel will be displayed. From here, you can configure and manage CIFS sharing.
3. Click the Winbind Options icon in the Global Configuration section.
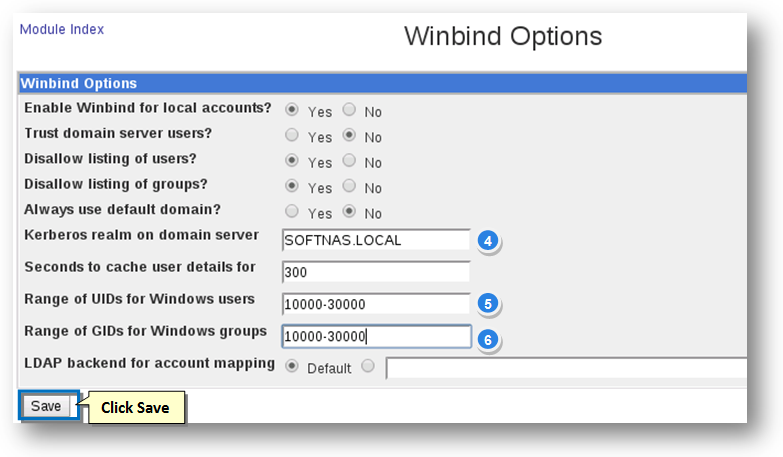
4. Enter the full domain name of your Windows domain; e.g., SOFTNAS.LOCAL, MYDOMAIN.COM, etc in the Kerberos Realm on Domain Server text entry box.
5. Enter the range as 10000-30000 in the Range of UIDs for Windows Users text entry box. Using this numeric range, the mapping of Windows user ID's to Linux UID's occurs dynamically.
6. Similary enter the range as 10000-30000 in the Range of UIDs for Windows Groups text entry box for mapping of groups.
7. Click the Save button.
Editing the /etc/samba/smb.conf File
1. Navigate to nano or vi editor as root user.
2. Open the /etc/samba/smb.conf file.
3. Delete these 2 lines:
winbind trusted domains only = yes
winbind use default domain = yes
4. Add these 2 lines:
winbind enum users = yes
winbind enum groups = yes
Restarting Services
You need to restart samba, winbind and connect softnas to domain and restart the services again.
[root@softnas] # service winbind restart
[root@softnas] # service smb restart
[root@softnas] # service nmb restart
[root@softnas] # net ads join -U administrator
When you run the net ads join -U administrator command make certain the administrator's user name is Exactly the same (in case, as it's case-senstive) and password match exactly as entered in step 3 under Active Directory Integration above.
[root@softnas] # service winbind restart
[root@softnas] # service smb restart
[root@softnas] # service nmb restart
Verifying that winbind Displays All Users and Groups
[root@softnas] wbinfo -u
SOFTNAS\administrator
SOFTNAS\guest
SOFTNAS\krbtgt
[root@softnas] wbinfo -g
SOFTNAS\winrmremotewmiusers__
SOFTNAS\domain computers
SOFTNAS\domain controllers
SOFTNAS\schema admins
SOFTNAS\enterprise admins
SOFTNAS\cert publishers
SOFTNAS\domain admins
SOFTNAS\domain users
SOFTNAS\domain guests
SOFTNAS\group policy creator owners
SOFTNAS\ras and ias servers
SOFTNAS\allowed rodc password replication group
SOFTNAS\denied rodc password replication group
SOFTNAS\read-only domain controllers
SOFTNAS\enterprise read-only domain controllers
SOFTNAS\dnsadmins
SOFTNAS\dnsupdateproxy
Creating CIFS Share Using SoftNAS GUI and add Valid users/groups
You need to create CIFS Share and add valid users and groups. For more information on creating a CIFS Share, refer to the following link.
1. On the CIFS Shares panel, click the name of the CIFS share link.
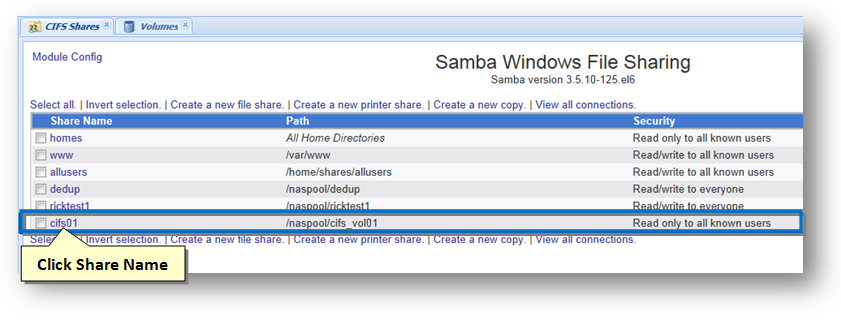
The Edit File Share dialog will be displayed.
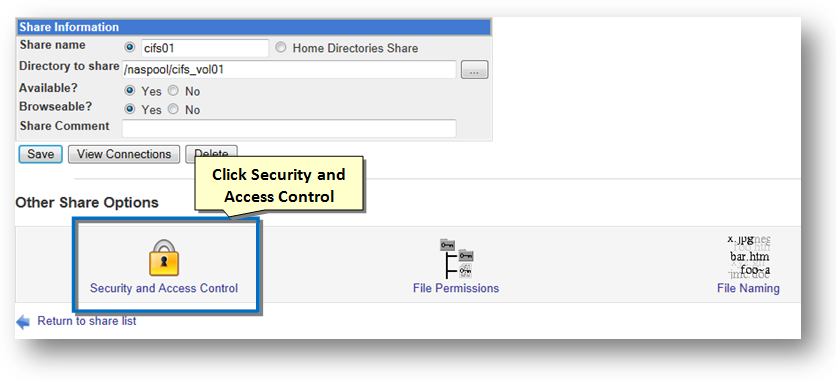
2. To configure and manage security and access control, click the Security and Access Control icon.
The Security and Access Control dialog will be displayed.

3. Enter a list of comma separated valid users who are allowed to access the shared volume, in the Valid Users text entry box.
4. Enter a list of comma separated valid grpi[s who are allowed to access the shared volume, in the Valid Groups text entry box.
5. Enter a list of comma separated invalid users who are not allowed to access the shared volume, in the Invalid Users text entry box.
6. Similarly, enter a list of comma separated invalid groups who are not allowed to access the shared volume, in the Invalid Groups text entry box.
7. Click the Save button.
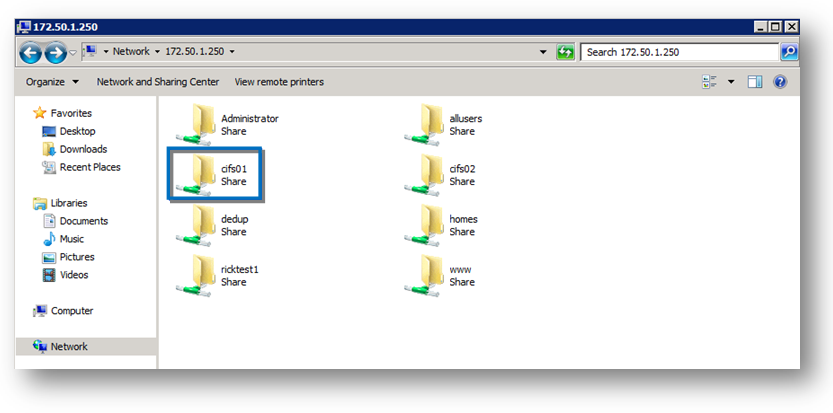
Verifying Access to the CIFS Share
1. To verify access the CIFS share, navigate to Windows system ->Windows Explorer.
2. Enter the UNC path of the SoftNAS server (or the DNS hostname if you have assigned one to SoftNAS).
3. Click on the Share icon and verify access permissions are set correctly from the Windows perspective.
4. Create a folder or text file and then right-click on the file/folder to verify that the Security permissions are as expected.
The CIFS share that was created is now available and ready for use.
Additional Information for Troubleshooting
Useful Commands
The following commands are useful when troubleshooting Active Directory integration issues.
# kinit -p administrator
Verify that Kerberos (winbind) is able to authenticate to the configured Active Directory domain (enter a domain admin account and password).
# net ads leave -U administrator (or an account w/ domain admin prrivs)
Remove SoftNAS as a member of the domain.
# net ads join -U administrator
Join SoftNAS as a member of the domain.
# wbinfo -u
Display a list of Windows users that will be mapped as valid Linux users.
# wbinfo -g
Display a list of Windows groups that will be mapped as valid Linux groups.
# wbinfo -t
Verify that the workstation trust account created when the Samba server is added to the Windows NT domain is working
Windows Event Log
Remember to check your AD / domain controller's Security event log if you find yourself troubleshooting AD integration issues, so you can see what is taking place from the AD perspective.
Domain Name Services
As with any network services, be sure DNS on your domain controller is configured with the SoftNAS node's IP address and name. Also, please ensure SoftNAS network interface is configured to use the domain controller(s) as its authoritative DNS server.
Kerberos and Server Times
Kerberos tickets are issued with a timestamp and expiration. Therefore, it is important that SoftNAS is properly time synchronized with the AD / domain controller. If your domain controller is your authoritative NTP server, then configure SoftNAS time server to point to the domain controller. If you use an external NTP server, make sure SoftNAS time is synchronized to the same source as your domain controller, so you don't experience any significant time drift between SoftNAS and your DC's time source.
Example Configuration Files
The following configuration files are properly formatted and valid, should you need to verify and/or troubleshoot configurations as you customize integration with your particular Active Directory environment (it's helpful to have a known working example as a reference point).
/etc/samba/smb.conf
[global]
log file = /var/log/samba/log.%m
load printers = no
idmap gid = 10000-30000
winbind enum users = yes
winbind enum groups = yes
winbind refresh tickets = yes
encrypt passwords = yes
realm = SOFTNASDEV.LOCAL <==== This is your long domain name; e.g., MYDOMAIN.COM, ADOMAIN.LOCAL, etc.
password server = WIN-00B96QS0C44.SOFTNASDEV.local <==== this is the DNS name of your AD / domain controller
template shell = /bin/bash
netbios name = SOFTNAS2 # <=== this is the name of your SoftNAS node in NetBIOS
server string = Samba Server Version %v
idmap uid = 10000-30000
workgroup = SOFTNASDEV <==== this is the short domain name
os level = 1
security = ads
max log size = 50
winbind separator = \
log level = 3
domain master = no
local master = no
preferred master = no
client use spnego = yes
client ntlmv2 auth = yes
[vol01]
comment = Shared volume
writeable = yes
browseable = yes
read only = no
path = /naspool1/vol01
valid users = "rbraddy" <=== use only the user name(s) here (not fully-qualified DOMAIN\username) or AD groups; e.g., "Domain Users", "Domain Admins"
Here are the other config files, in case you need working examples.
/etc/krb5.conf
[logging]
default = FILE:/var/log/krb5libs.log
kdc = FILE:/var/log/krb5kdc.log
admin_server = FILE:/var/log/kadmind.log
[libdefaults]
default_realm = SOFTNASDEV.LOCAL
ticket_lifetime = 24h
renew_lifetime = 7d
forwardable = true
[realms]
SOFTNASDEV.LOCAL = {
kdc = WIN-00B96QS0C44.SOFTNASDEV.local
admin_server = WIN-00B96QS0C44.SOFTNASDEV.local
default_domain = SOFTNASDEV.LOCAL
}
[domain_realm]
.softnasdev.local = SOFTNASDEV.LOCAL
softnasdev.local = SOFTNASDEV.LOCAL
[appdefaults]
pam = {
debug = false
ticket_lifetime = 36000
renew_lifetime = 36000
forwardable = true
krb4_convert = false
}
/etc/nsswitch.com
passwd: files winbind
shadow: files
group: files winbind
#hosts: db files nisplus nis dns
hosts: files dns
bootparams: nisplus [NOTFOUND=return] files
ethers: files
netmasks: files
networks: files dns
protocols: files
rpc: files
services: files
netgroup: files
publickey: nisplus
automount: files
aliases: files nisplus